Why LangGraph exists
If you have only built prompt-in, answer-out chatbots, LangChain often feels sufficient. A policy bot, FAQ assistant, or a simple retrieval flow usually follows a predictable sequence: receive a question, gather context, call the model, return an answer. The control flow is mostly linear, and the application logic is deterministic enough that a chain abstraction works well.
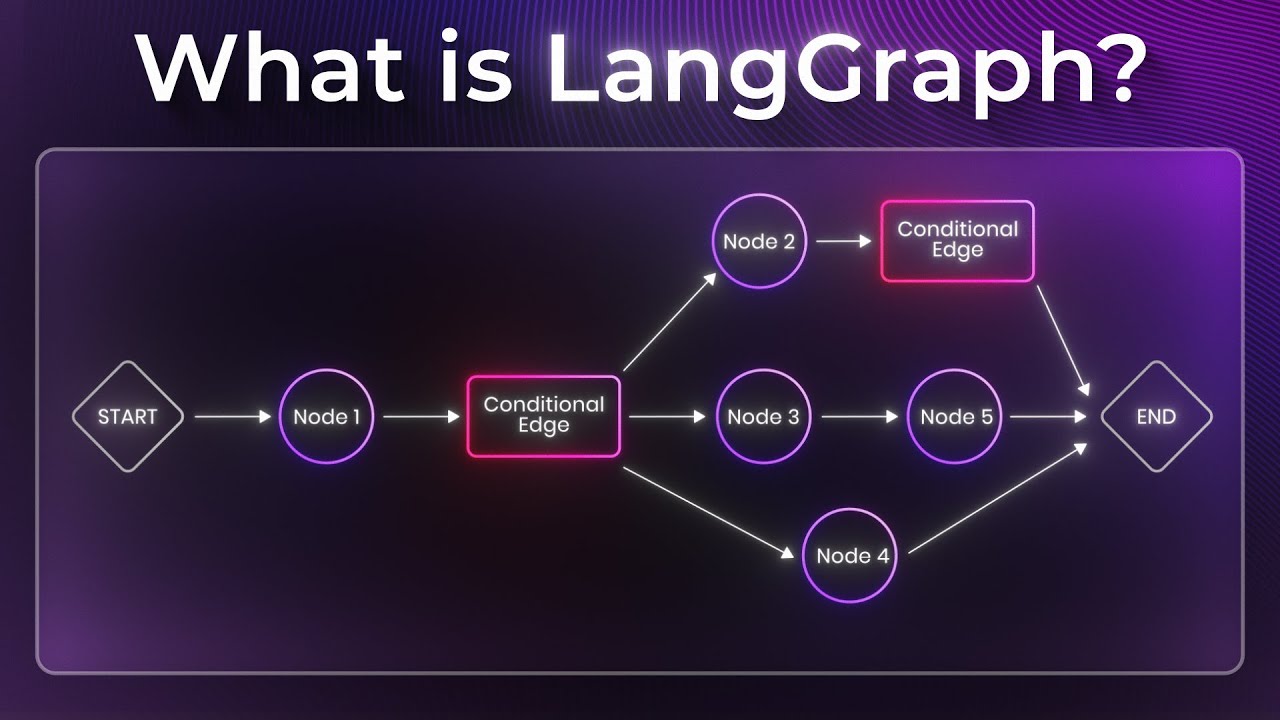
LangGraph becomes valuable when the workflow is no longer a straight line. The moment your application needs to decide what to do next based on intermediate results, repeat steps until a condition is met, preserve shared state across multiple operations, or coordinate several specialized actions, you are no longer solving a “single prompt pipeline” problem. You are solving an orchestration problem.
A practical rule is this:
- Use
LangChainwhen the task is mostly sequential and predictable. - Use
LangGraphwhen the task needs state, branching, iteration, or multi-step agent behavior.
That distinction matters because many teams start with a chain and then keep bolting on manual control logic. Soon they are managing loops, if-else routing, retries, memory objects, tool calls, and partial results in ordinary Python code. The codebase becomes harder to reason about than the business problem itself. LangGraph exists to move that orchestration into an explicit graph model.
The mental model: nodes, edges, and shared state
LangGraph’s core idea is the StateGraph.
A node is a unit of work. In practice, it is often a Python function that reads the current state and returns updates. Examples:
- search for sources
- scrape a page
- score credibility
- extract facts
- write a report
An edge defines how execution moves from one node to another.
- A normal edge always goes to the same next step.
- A conditional edge routes based on data in state.
The state is the most important piece. It is the shared memory of the workflow. Instead of passing ad hoc variables between scattered functions, you define a state schema once and let nodes read and update it throughout the graph lifecycle.
For a research assistant, a minimal state might contain:
from typing import TypedDict, Optional, List

class ResearchState(TypedDict):
    topic: str
    remaining_urls: List[str]
    current_url: Optional[str]
    content: Optional[str]
    current_score: Optional[int]
    facts: List[str]
    report: Optional[str]
This design gives you three immediate benefits:
- Every node works against a known data contract.
- Routing decisions are explainable because they depend on explicit state.
- The workflow can preserve memory across multiple steps without inventing custom plumbing each time.
That is the conceptual jump beginners need to make. LangGraph is not “LangChain with extra syntax.” It is a graph-driven way to build applications whose behavior depends on evolving state.
A concrete use case: a deep research assistant
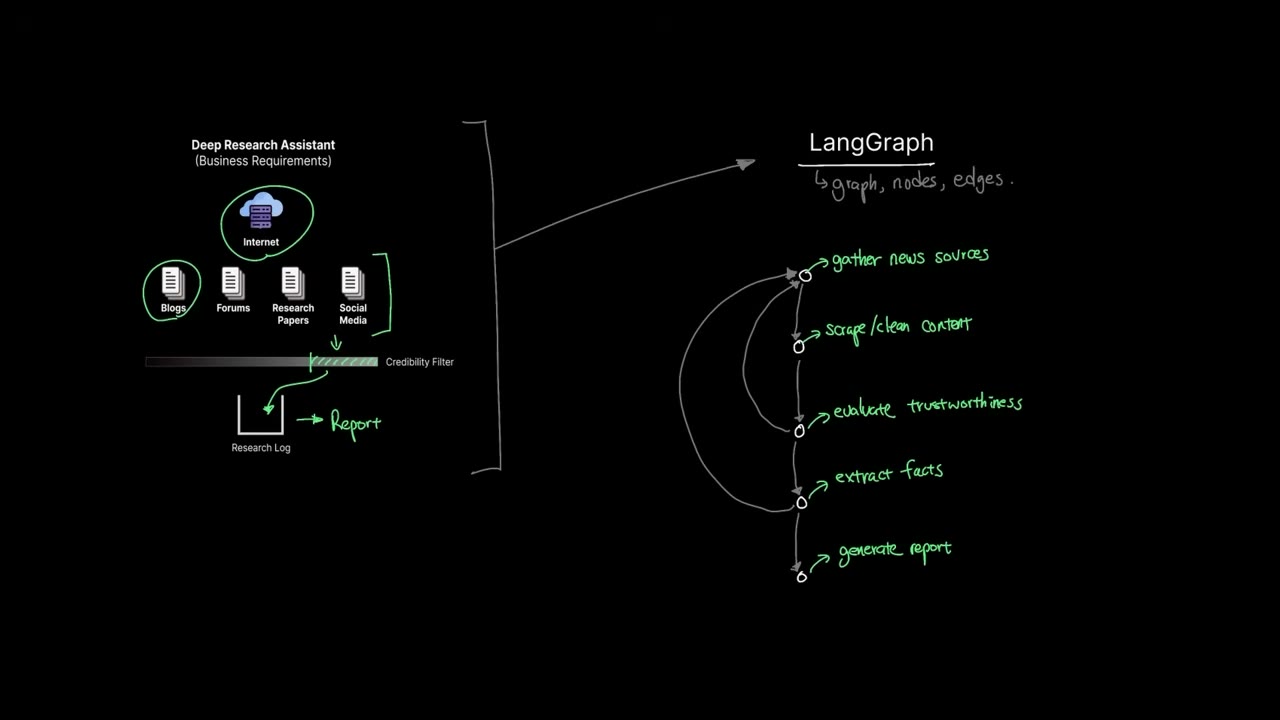
A good beginner project is a research assistant that gathers information on a topic, filters weak sources, extracts reliable facts, and compiles a final report.
Suppose the topic is Tesla earnings call. The business requirements might be:
- search the web for relevant sources
- fetch and clean content from each source
- evaluate whether each source is trustworthy enough
- reject weak sources below a threshold such as
75 - extract factual statements from accepted sources
- generate a final report
Without LangGraph, many developers implement this as a pile of functions plus manual orchestration code:
- Call a search API.
- Loop through URLs.
- Scrape each page.
- Send content to an LLM for evaluation.
- Check the score.
- Store accepted facts.
- Merge them into a report.
This works, but maintenance becomes the real problem. You need to track where you are in the process, which URLs remain, what content is being processed, whether the last score passed the threshold, whether another iteration is needed, and when the workflow should terminate.
In LangGraph, that orchestration becomes the graph.
A clean version of the assistant usually includes these nodes:
gather_sourcesload_next_sourcescrape_and_cleanevaluate_trustworthinessextract_factsgenerate_report
And these routing decisions:
- If no URLs remain, stop iterating and write the report.
- If the current source score is below the threshold, skip fact extraction for that source.
- If URLs still remain, loop back and process the next one.
That is where LangGraph starts to feel natural. The business workflow itself becomes visible in the structure of the graph.
Sequential chains versus stateful graphs
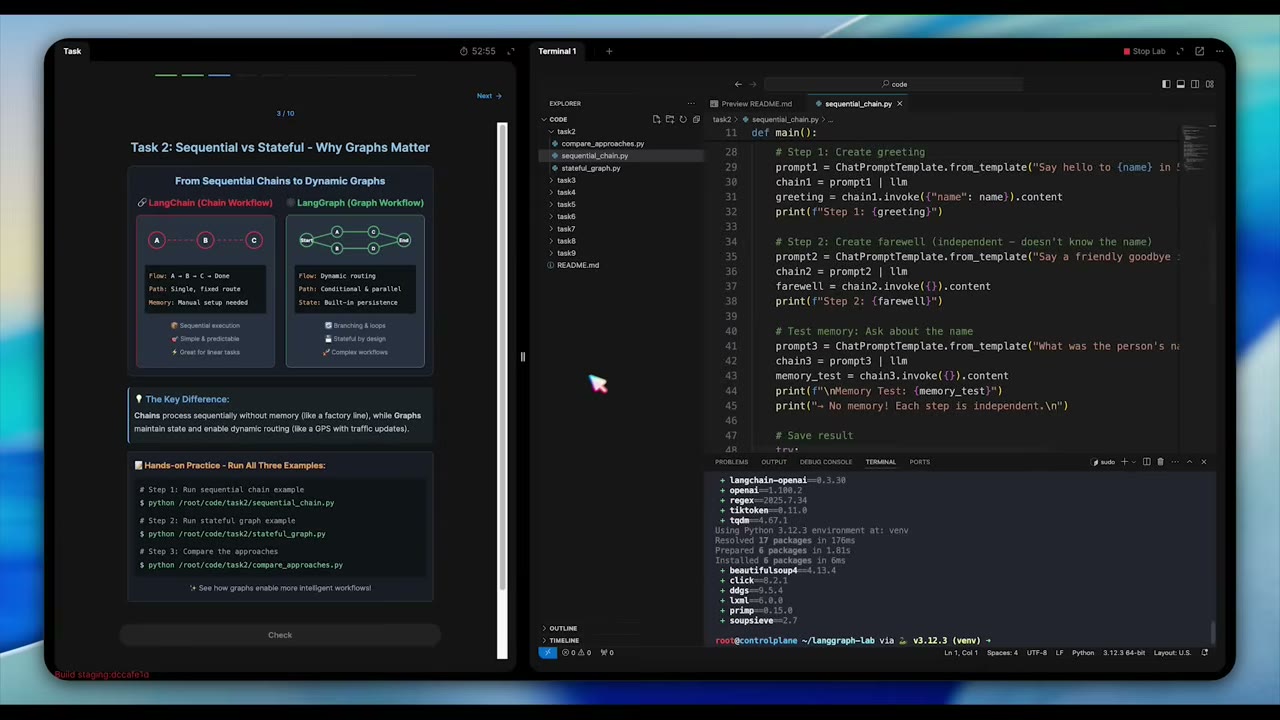
One of the most useful beginner comparisons is a tiny conversation example.
A sequential chain might do three independent steps:
- greet Alice
- say goodbye
- ask the model to remember the name
If each step is isolated, the final memory check fails because the earlier name was never persisted in a shared workflow state.
A stateful graph solves this by storing the name once and letting later nodes reuse it. The farewell node can say goodbye to Alice specifically, and the memory check can still access the stored value.
This is the difference you should remember:
- A chain passes outputs along a path.
- A graph operates over a shared state that survives across the workflow.
That difference looks small in a toy example, but it becomes decisive in production systems. Once tools, retries, evaluation, and branching are involved, persistent state is what keeps the workflow coherent.
Environment setup for a beginner-friendly stack
A simple LangGraph lab environment typically includes the graph framework, LangChain core packages, web search tooling, scraping helpers, and an LLM integration.
A representative install command could look like this:
# Example command
pip install langgraph langchain langchain-core langchain-community \
  duckduckgo-search beautifulsoup4 langchain-openai
Keep two setup decisions explicit from the start.
1. Search provider choice
For learning, duckduckgo-search is a practical option because it can support simple web search experiments without requiring a paid search API. That reduces initial friction and lets you focus on graph behavior.
2. Scraping and extraction boundaries
beautifulsoup4 is useful for extracting readable text from HTML, but beginners often forget that raw HTML is not usable state. You should normalize it before sending it to the model. At minimum:
- remove script and style blocks
- collapse repeated whitespace
- trim very long pages
- preserve source URL metadata alongside extracted text
3. Model integration details
If you use langchain-openai, confirm these items before debugging the graph itself:
- the API base URL, if you are using a proxy or compatible gateway
- the model name
- the API key environment variable
- token and timeout limits for long pages
A common mistake is blaming LangGraph when the real issue is an incorrectly configured LLM client.
Designing the state before writing nodes
Beginners often start by writing functions first. In LangGraph, that is usually backward. The better order is:
- Define the business outcome.
- Define the state required to reach it.
- Define the nodes that read and update that state.
- Define the routing logic.
For the research assistant, a stronger beginner-friendly state would be:
from typing import TypedDict, Optional, List, Dict

class ResearchState(TypedDict):
    topic: str
    remaining_urls: List[str]
    visited_urls: List[str]
    current_url: Optional[str]
    content: Optional[str]
    current_score: Optional[int]
    accepted_facts: List[str]
    rejected_sources: List[Dict[str, str]]
    report: Optional[str]
    status: str
Why add these fields?
visited_urlsprevents duplicate processing.accepted_factsseparates usable output from raw content.rejected_sourceshelps debugging and auditability.statusgives you a simple operational indicator such assearching,processing,reporting, ordone.
When state is underspecified, the graph becomes fragile. When it is overspecified, the graph becomes noisy. The right balance is to store only what later nodes or operators will actually need.
Building the research workflow step by step
Step 1: gather candidate sources
The first node takes topic and performs a web search.
Input:
topic
Output updates:
- populate
remaining_urls - set
statusto something likesources_found
This node should also normalize URLs, deduplicate them, and ideally keep only a bounded number of results. Beginners often pass twenty or fifty URLs into the graph and then wonder why cost and latency explode. For a first version, process 3 to 8 sources only.
Step 2: load the next URL
This node selects the next source to process from remaining_urls and writes it into current_url.
Output updates:
current_url- updated
remaining_urls - append to
visited_urls
This design is important because it keeps iteration explicit. You are not hiding the loop in a for statement outside the graph. The graph itself owns the progression.
Step 3: scrape and clean content
This node fetches the page and extracts meaningful text.
Output updates:
content
Practical cleaning rules:
- discard navigation and boilerplate when possible
- limit body length before LLM evaluation
- attach URL context to the prompt so the model knows the source
- fail gracefully on empty or blocked pages
A production-minded version should also store a fetch status or error reason, but for a beginner build, at least detect empty content and route around it.
Step 4: evaluate trustworthiness
This is the node where the LLM scores the source. The video example uses a credibility threshold such as 75%.
Important design decision: do not ask the model only “Is this trustworthy?” Ask for structured output.
A better prompt asks the model to return:
- numerical score from
0to100 - short explanation
- major warning flags such as rumor, missing author, promotional tone, or unverifiable claims
This lets the graph route based on current_score while still preserving an explanation for later review.
Step 5: conditional routing
After scoring, use a conditional edge.
- If
current_score >= 75, go toextract_facts. - Otherwise, skip to the next source.
This is the first place where LangGraph clearly outperforms a naive sequential chain. The workflow is no longer “do every step for every input.” It is “choose the next step based on state.”
Step 6: extract facts from credible content
This node should not summarize loosely. It should extract discrete factual statements.
Examples of good extracted facts:
Tesla reported quarterly revenue of X.The earnings call took place on date Y.Management guided for Z.
Examples of weak extraction output:
The company seems optimistic.This article is mostly positive.
The point is to build a report from evidence, not impressions.
Step 7: loop until sources are exhausted
After fact extraction, route back to load_next_source if remaining_urls is not empty.
This loop is one of LangGraph’s defining strengths. Instead of manually managing repeated execution around an agent, you express iteration as graph structure plus state transitions.
Step 8: generate the report
When no URLs remain, run the report node.
A good report node should:
- group facts by theme
- distinguish high-confidence facts from uncertain ones
- cite which source contributed which claim, if your state stores that mapping
- produce a concise executive answer plus supporting detail
The output becomes much more reliable if the node consumes curated facts rather than raw page text.
How routing, loops, and tools fit together
Many beginners see LangGraph as “just a graph wrapper.” That undersells what it gives you in practice.
Conditional branching
Conditional edges let the graph choose the next node according to state. Typical routing questions include:
- Is there another source to process?
- Did the credibility score pass the threshold?
- Was scraping successful?
- Should we retry, skip, or end?
Loops and iterations
A research workflow nearly always needs repetition. Every new URL goes through similar steps, but not always the same path. Some fail scraping, some fail credibility checks, some yield strong facts. Loops in LangGraph let you express that repeated evaluation cleanly.
Tool integration
The example stack includes free web search plus scraping. In broader LangGraph systems, tools may include:
- search engines
- vector stores
- SQL databases
- internal APIs
- calculators
- document parsers
The graph does not replace tools. It coordinates when they are called, what state they consume, and what outputs they contribute.
Memory and persistent state
This is the reason many teams adopt LangGraph after hitting complexity walls. Nodes do not need to rediscover context every time. Shared state keeps topic, progress, current source, accepted evidence, and final output connected throughout the run.
A minimal implementation shape in Python
The exact APIs evolve, but the workflow structure typically looks like this in concept:
from langgraph.graph import StateGraph, START, END

workflow = StateGraph(ResearchState)

workflow.add_node("gather_sources", gather_sources)
workflow.add_node("load_next_source", load_next_source)
workflow.add_node("scrape_and_clean", scrape_and_clean)
workflow.add_node("evaluate_trustworthiness", evaluate_trustworthiness)
workflow.add_node("extract_facts", extract_facts)
workflow.add_node("generate_report", generate_report)

workflow.add_edge(START, "gather_sources")
workflow.add_edge("gather_sources", "load_next_source")
workflow.add_edge("load_next_source", "scrape_and_clean")
workflow.add_edge("scrape_and_clean", "evaluate_trustworthiness")

workflow.add_conditional_edges(
    "evaluate_trustworthiness",
    route_after_scoring,
    {
        "extract": "extract_facts",
        "next": "load_next_source",
        "report": "generate_report",
    },
)

workflow.add_conditional_edges(
    "extract_facts",
    route_after_extraction,
    {
        "next": "load_next_source",
        "report": "generate_report",
    },
)

workflow.add_edge("generate_report", END)

graph = workflow.compile()
The node functions should return state updates, not mutate random globals. That discipline makes the graph testable and debuggable.
Common beginner mistakes and how to avoid them
Mistake 1: treating state like a dumping ground
If you store everything, the prompts become noisy and the workflow slows down. Keep raw HTML, cleaned content, extracted facts, and final report clearly separated. Do not keep appending unbounded text blindly.
Mistake 2: skipping structured outputs
If a scoring node returns a paragraph instead of a numeric field plus rationale, routing becomes brittle. Ask for machine-friendly outputs whenever a later edge depends on them.
Mistake 3: mixing orchestration with business logic
A node should do one thing well. Searching, cleaning, scoring, extracting, and reporting should remain separate. If one node does all of them, the graph loses its value.
Mistake 4: no failure path
Web scraping fails. Pages block requests. Models timeout. URLs return thin content. Add routing for empty content, low-quality sources, and exhausted retries.
Mistake 5: no budget controls
Even a small graph can become expensive if every node sends large content blocks to the model. Limit source count, chunk long pages, and trim prompt context aggressively.
When a business should choose LangGraph
LangGraph is not mandatory for every LLM application. It becomes a strong fit when the system must satisfy requirements such as:
- multi-step reasoning across different tools
- deterministic orchestration around model calls
- repeated evaluation loops
- stateful workflows that preserve intermediate results
- auditable routing decisions
- modular workflows that can be changed node by node
Examples include:
- research assistants
- document review pipelines
- support agents with verification stages
- compliance and policy checking systems
- workflow automation that mixes search, retrieval, scoring, and reporting
If your application is only a prompt plus retrieval plus answer, LangChain alone may be enough. If your application starts asking “what should happen next?” repeatedly, that is the LangGraph signal.
A practical build sequence for your first project
If you want to build your own beginner project without getting lost, follow this order:
- Create a tiny state schema with only the fields you truly need.
- Build a two-node graph that proves state persistence.
- Add one tool, such as search.
- Add one conditional route, such as pass or fail on score.
- Add one loop over multiple items.
- Add a final synthesis node.
- Only then improve prompts, observability, and error handling.
This order matters because many new users try to build a full autonomous agent on day one. They end up debugging five problems at once: tooling, prompts, control flow, state, and model configuration. A staged graph build is faster and more reliable.
Final operational checklist
Before you call a LangGraph workflow “ready,” confirm these items.
- State schema is explicit and minimal.
- Every node has one clear responsibility.
- Every conditional edge is based on state fields you can inspect.
- Search results are deduplicated and capped.
- Scraped content is cleaned and length-limited.
- LLM scoring returns structured values, not free-form prose only.
- Low-quality or empty sources have a skip path.
- Loops terminate when inputs are exhausted.
- Final report is built from extracted facts, not raw pages.
- Model credentials, base URL, and timeouts are validated separately from graph logic.
- Logs or debug traces show which node ran and why the next edge was chosen.
- Token and latency budgets are acceptable for the number of sources processed.
Source attribution
This tutorial is based on the YouTube tutorial “LangGraph Explained for Beginners” by KodeKloud, with the workflow concepts adapted into a standalone written guide: https://www.youtube.com/watch?v=cUfLrn3TM3M